Designing & Prototyping achievable solutions
As we said, the whole Robot Application Development Process can be divided into distinct phases. Now that you are able to picture the scene clearly thanks to your analysis of the situation, let's focus on designing and prototyping a creative and relevant solution!
For the sake of simplicity, these two steps of designing and prototyping are presented as linear, but they are actually iterative loops and not sequential steps.
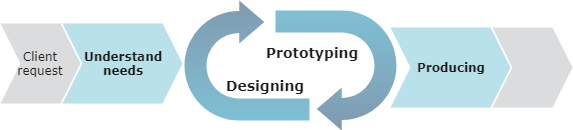
1. Designing
Design is the response to the identified needs of a user and/or a client following general editorial principles and specific constraints.
In the case of a B2B human-robot interaction, it means responding to the request of a client (eg. welcoming customers), addressing users’ needs (eg. users need to know where the cashier is), and following both general principles about human-robot interaction (eg. the robot is not tablet-centered) and specific rules (eg. users should not spend more than 2 minutes with the robot).
Designing a robotic experience includes interaction design, character design, stage design _and _content design. Each sub-phase contributes to the building of a seamless, easy and effective solution that lead to the creation of an app manifesto.
Experience design provides developers with a global direction and gives them an idea of what has to be developed, enables clients to see if the solution really fits their request and brand image, and helps users feel more comfortable with the robot and satisfied with the service he provides.
a. Using an efficient method
There are many methodologies for designers, so we encourage you to pick whatever you feel comfortable with. But the most important things to do are: * Iterate! Working with a robot is difficult. You will encounter problems unrelated to your code, such as motors overheating, or unexpected behavior from the users. It is impossible to think of all the possible issues beforehand, and no one can find the perfect solution on the first iteration. Discuss the possibilities with people working on similar problematics, and try to find different ways to solve the issues.
- Communicate with robotic animators, graphists, developers, UX, testers...
- Involve people when they need to be during the designing process.
- Robotic animators will give you hints about ways to express your intentions with the body language of the robot.
- Developers have their own constraints, tell them what you want to do, and let them come back to you with solutions.
- UX will adjust your design to best fit the interest of the final user. Keep them in the loop if you encounter specific problems in the interaction.
- Scriptwriters need to know the context of what the robot will say and why, they need to work closely with the other teams in order to produce the best content possible. Involve them in all situations that require the robot to talk.
- Give all the information you can to the project manager. Be aware that your ideas need to stay within the scope of the project’s schedule and budget.
- Take responsibility for yourself! The solution you choose is based on your analysis. You made choices, you have to defend them! Make sure to be explicit about your reasons so that the team understands your point well.
- Being pragmatic is also about making choices and sticking to them. Once you have designed a piece of the solution, define a deadline and stay on schedule! Your design_ will never be perfect_ if you consider the multiple ways to solve a single problem. Stick to the practical ideas you defined based on what can be achieved, wrap up your designing phase, and move forward! You will be able to come back to this step to improve things later on, on the next iteration or even the next project.
b. Considering the problem to solve
Let’s assume a scenario where your client’s needs can be defined as “avoiding that the customers who came to pick up their purchase made online waste their and other people’s time waiting in line”.
Let’s rephrase the use case: the robot should be able to identify a customer who came to pick up an online purchase, and open a locker containing the specific items so that the customer doesn’t have to wait in line.
What should you do ?
Discuss with your developers team. Using connected lockers like the Amazon lockers can be difficult, let them look for a few different solutions.
Here are a few hints to help them find what they need : * What is the maximum price for the lockers? * Wifi accessibility; * Space available for the lockers and around them...
Iterate with UX designers about the identification of the user, what are the best solutions, what already exists in the state of the art. * The project manager should start with RGPD issues, and identify what could be blocking with the identification. * There are legal and privacy issues with face recognition, you should make sure that the scenario fits these constraints before proceeding with development. This is time consuming, maybe you don’t want to go through this process.
Inform the robotic animators about the space the robot will be in. * Is the robot moving, or is he fixed? This will have an impact on the animations: for example, it will take more time to make an oriented animation to show the lockers from any possible position than if the robot is always at the same place. * Plus, remember that if the robot is plugged in, the rotation of the base will not be available due to security constraints.
Business/client: you decided on a specific solution to tackle the problem based on the various constraints: * Using the loyalty program card of the shop, * Detected by RFID or codebar reader.
The answers to these questions lead to the creation of your app manifesto, an important output for your team.
Let’s go on to the prototyping phase!
2. Prototyping
A prototype is an example that serves as a basis for future models. Prototyping gives designers an opportunity to research new alternatives and to test the existing design to confirm a product’s functionality prior to production.
The main goal of a prototype is to get valuable feedback before the production is started.
a. Prototyping our use-case
Sometimes the solution you settled on reveals unexpected issues once implemented: what works in theory can be very different on a robot, because of the limitations of the platform, the specificity of the users that will interact with the robot, or other unforeseen circumstances that can lead you to rethink your plans. These issues have to be identified as soon as possible, before they cause delays and financial losses. Identify risks before they turn into problems!
The solution you settled on is to use the shop’s loyalty card in order to identify the person and open the correct locker.
In theory, this works well, your tech team already knows how to connect to this service and is really confident with it.
Now it’s time to prototype this interaction. In your company, some people are already real customers for this shop, with loyalty cards, and some are not but you just ask them to pretend that they are. You’re counting on a quick and easy validation!
But in fact, you realize that it takes time for the users to get their card (it can be in their bag, or they have to find it on their phone), so that the timer you implemented to reset the interaction is triggered several times before they finally get it.
Plus, once they’re finally ready to use it, they don’t know how to. Should they show it to the robot? If so, where? In front of the robot’s eyes, or tablet? Or maybe put it in his hand?
Because of these pain points, you realize that this interaction now takes longer than just waiting in line like before.
Don’t worry, it’s not a problem. We are prototyping right now, so it’s normal. You can now think of a way to solve these pain points, maybe by trying another solution to the problem, or by just moving on to a new phase of design.
b. What are the tools to prototype ?
First of all, keep in mind that prototyping should be easy, and not time-consuming. Also, it is important to be able to show your prototype a lot of times.
Developing a prototype directly on the robot isn’t a good idea. It takes a lot of time, it might bug or crash, and have side effects that were not intended because you had to code quickly.
The best is probably to code nothing for a prototype.
Use drawings, in order to show a concept, a global idea of what it should look like in the end.
Use cardboard, cut it, bend it: you can for example re-create a model of the room where the robot will be, showing the lighting, where people walk, and the main points of interest.
Use mimes to recreate your interaction, but be honest! If you’re playing Pepper, sit on a chair and put a phone or even a drawing of the tablet on your torso. Really act like the robot would. If there is something strange in your behavior, for example an infinite loop in a given situation, don’t try to hide it or to rewrite it on the spot: mime it as is, repeat it for as long as the user doesn’t exit it. This will help you identify blockers and pain points so you can design a smoother interaction.
Miming can also be a good tool in order to spot where assets (sound, animation, texts ... ) are needed.
If you plan to use specific libraries that don’t depend on the robot, try to make them run on your computer first.
Moreover, if you want to try things out on the robot, use tools to simplify it: make the robot talk or move with simple calls in a shell, use Choregraphe with Pepper (NAOqi 2.5).
Take videos of your prototypes, watch them with your team, and make your team members act as the robot to spot other potential issues.
Is your prototype a good answer to your client’s request? Are you satisfied with this interaction? Then you should move on to the next part, development!
Pepper (NAOqi 2.5)’s Choregraphe, a multi-platform desktop application to create, test and monitor robot applications.